Another Impossible WP Solution
I was trying to emulate the appearance of multiple subfolders of files in the installations root directory, but these folder names would conflict with pages that need to be the same name.
In other words, I wanted media files to appear as if they were in the same folder as the page as if it the page URL was a real folder.
Example:
http://example.com/courtcase/
would be the page for a court case and
http://example.com/courtcase/testimony.pdf would be a document referenced in it
I COULD change the upload directory to the install root and then subfolders using a plugin that allows organizing media files this way. HOWEVER, calling on the page slug will cause the server to open the file directory for the actual folder rather than the page in the WP database.
So I needed to have the media files in another directory than the install to eliminate conflicts, and then have slugs for files just start at the install directory path.
Example:
http://example.com/wp-content/uploads/courtcase/testimony.pdf
would become
http://example.com/courtcase/testimony.pdf
And of course I needed this done for all media files, not manually adding redirects for each one.
{NOTE: This was a client requirement. Yes, it’s crazy to be so concerned with URLS, but that’s the demand.}
After talking with my friend Bill Caffery, we agreed we needed slugs for the file URLS, but didn’t know how to automate it. I was thinking some wildcard redirects in the HTACCESS files of the upload directory and/or install directory, but that would only work one way, so to speak. He was thinking to hell with WordPress and use something else like Symphony. I wasn’t down with learning another platform as my model has always been to focus and excel at core competencies, and that means limiting the software I use for given tasks. I also didn’t want the client to have to add lines of redirects and what-not.
So I was counting on finding a way to get WordPress to create slugs for the media files. After all, it already odes this easily and seamlessly for posts and pages. So I needed two things:
(1) A media library management system that allowed sub-folders;
(2) A plugin (ideally, rather than hacking the PHP) to designate the ‘uploads’ folder.
Or at least that’s what I thought I would need, and after some experimentation found what actually worked.
First, the media library system had to NOT be independent of the media library like many of the plugins did — it needed all media to register with WordPress so it would place slugs for their URLs in the database. This was accomplished by using the Media Library Folders plugin.
Secondly, I got another plugin to move the location where media was uploaded, but then the plugin above wasn’t able to manage the files outside the usual default folder. So after many attempts and database table cleanings, I decided to leave the folders in the usual place and just change the URL to create correct slugs. It was trial and error that I realized the second plugin actually did this, WP Original Media Path.
I had to check a box saying I knew what I was doing (I lied) and it gave a second setting box. The main setting was the path for the media folders and files, which I tried to make the install root — successful but not solving the problem. I THOUGHT this was the location/pathname of the files, but it was not. It was the slug. The hidden setting was the actual folder. So I made the former the URL base I wanted and the latter the default folder.
I found I had to recreate the folders and upload the files manually, but otherwise, it worked!
Like my father always says, “The difficult you can do right away; the impossible takes a little time.”
Artisteer vs. TemplateToaster
{Caveat: I am a heavy WordPress user. Artisteer and TemplateToaster are WYSIWIG CMS theme-builders not limited to WordPRess, but I will be dealing from a WordPress point of view, so some of the below may not apply outside of that. And as with any such reviews, be aware of the date. This is about the two CMS theme platforms, Artisteer and Template Toaster (version 4.x), as of the beginning of May 2014. I discuss Artisteer version 4, but most references are to version 3, for reasons explained below.}
There are plenty of ways to develop WordPress site designs, from highly customizable themes and framework plugins, to development tools such as Artisteer and TemplateToaster. These last two have been invaluable to me, as I want to focus directly on design and layout, not code.
How they are (mostly) similar
Both Artisteer and TemplateToaster generate WordPress theme .ZIP files containing all the necessary elements, templates, and CSS files. Simply export from the program(s), then upload the file using the Dashboard, install, and activate. Artisteer also lets you include in the .ZIP file a copy of the project file (Artisteer’s .artx format) that could be a helpful archive if you lose the original file, or simply want a snapshot of that version of your theme.
These are WYSIWYG editors. They both have a ton of settings from general layouts to minute, granular adjustments for very specific text (such as the font size of a visited link in a widget). You may have to dig through the menus a bit to find every little detail you want to change, but it’s worth it. The overall interface is so similar, my guess is TemplateToaster is based heavily on Artisteer, to the point I wouldn’t be surprised if it was started by ex-employees. But there are many distinct differences that, depending on what is important to you, could be a deal-breaker for one or the other.
Both are inexpensive and worth every penny: $129 for Artisteer, and $99 for TemplateToaster.
Framework and Responsive Layout
This is the biggest gap between the two.
TemplateToaster allows for three templates (“index”, “PageTemplate1”, “PageTemplate2”) so that you can have different layouts available (columns, etc.) for use in pages. It is also fully responsive, and you can even preview it based on various devices (portrait and landscape).
Artisteer 4 is responsive at well, but this is by no means a tie, since this latest version of Artisteer is incompatible with still-heavily-used versions of Internet Explorer. The company’s response? Update your browser. Seriously — somehow you as designer are supposed to have the magical ability to get all your client’s potential client’s across the world to upgrade their browser. This not only reveals a huge gap between the developers of Artisteer and marketplace reality, but an outright apathy toward it. Their users — including myself — have been begging for them to fix this for some time, and it seems more likely the market will change before this happens however long it takes.
This is why I — and so many others — have uninstalled version 4 and restored version 3. The problem there is that is it not responsive, and you must use a plugin to enable a mobile theme (such as WP Touch and Carrington).
This is also why most of the comparisons below are for version 3 of Artisteer, not 4.
Design Suggestions
TemplateToaster has a library of easily choosable themes or you may start “from scratch”. Artisteer has color themes to choose from, but not complete designs. Well, that’s not true. Both will give you a nearly infinite number of design suggestions both to start with and for individual elements, randomly generated but with a sane sense of color combinations. In my opinion, Artisteer’s suggestions are far more vibrant, so much so I often wish I had a project just to use this or that suggestion.
In this respect, if you take the time to sort through suggestions and don’t have pre-established design criteria, you will probably find a LOT less tweaking using Artisteer. In general, Artisteer also bundles settings of fonts and colors far better, whereas you may end up wit ha long list of individual element changes in TemplateToaster.
Visual Design Abilities
With Artisteer, almost everything has a transparency setting; TemplateToaster has very few transparency options. On the other hand, TemplateToaster allows for the use of an image and not merely a texture or color for many elements, such as widget areas and even buttons. It’s a trade-off.
Both have plenty of textures and stock images to choose from, and nice effects to boot. Artisteer seems to have a better library, but TemplateToaster enables adding multiple foreground images (and even has pre-made logos) for the header. In fact, TemplateToaster allows for more text areas in the header, though not as smooth in tweaking header setting as Artisteer.
Artisteer gives Flash effects options for the header, but Template Toaster allows for a header slideshow. Again, a trade-off.
Other Considerations & Conclusion
There are more theme options in the WordPress dashboard once a TemplateToaster theme is activated, but when you switch themes you may have to redo or re-save settings each time, particularly the placement of menus in sidebars. In Artisteer, just make sure any custom menu is still in place for the main navigation.
I must mention one more amazing thing: TemplateToaster has a huge number of customizable widget areas, allowing for some nice framework flexibility. It bogs down the widget page on the dashboard if you don’t use them, but is a heaven-send if you want to insert some content in between spaces in the layout, such as between the main content and the footer, or in the main body above or below the content and/or sidebars.
There are other details too exhaustive to mention here, but if we have to reach a conclusion, it really depends on your needs and preferences as a developer. For me, Artisteer is a faster path to getting design done, but lacks responsive design unless you want to alienate a big segment of web users. TemplateToaster gives more control, but also demands more attention.
A lot of people have migrated to TemplateToaster from Artisteer, though Artisteer seems more “finished” in its user experience, TemplateToaster a touch like it’s still developing. I use both, depending on the project parameters. If I have the time and the client needs a slick mobile version, it’s TemplateToaster. If it’s a simple site not expected to be used on phones often, Artisteer 3 saves me a lot of time. I only wish their project files were compatible or could be imported and exported between them.
3 Helpful Rules in Choosing WordPress Plugins
{Note: This articles pertains to installing plugins on private WordPress installations, not WordPress.Com}
 I’ve always said there might be a thousand WordPress plugins for something you need to do … and they’re almost all cr@p. The main benefit of WordPress, being open source, is that anyone can make a plugin. The main problem is that anyone can make a plugin.
A simple search will yield a list of possibilities, some relevant to your particular need, many not. Some you won’t know for sure until/unless you can translate the description and other details from Russian. And whether or not it will do what you need it to do — without loosing your hair or mind making it work — is yet another story.
We’ve successfully implemented dozens and dozens of now tried and true solutions, often involving hours of research and testing. Our process has been fine-tuned to a few simple rules. So how does Kentropolis choose plugins for our clients?
Rule #1 – Take Advantage of WordPress.Org
First, we use the repository at WordPress.Org almost exclusively. These plugins (and themes), have been reasonably vetted to not contain malicious code. More importantly, they are rated by users to determine quality and compatibility.
The limitation is that they only list free plugins — sort of. Many of these plugins have premium versions with more features (and support). A few are not free at all after you install them, and some require subscribing to some service for them to actually work.
But what of paid plugins? In developing over a hundred WordPress sites in the last few years, we’ve never needed one, even for very complicated needs. The breadth of free plugins available is astounding if you are willing to take the time to search and test. Yes, most are cr@p, but if you can think of any possible functionality, there’s a good chance there’s at least ONE plugin that will do the job.
{There’s a lot to be said for paid plugins, however, but that could be left for another article.}
!["[A]nything you can imagine"? Well ... actually, yes.](http://geeksbearinggifts.com/wp/wp-content/uploads/wordpress-plugins-anything-imagine.gif)
“[A]nything you can imagine”? Well … actually, yes.
Rule #2 – Analyze Ratings
If you search plugins from a WordPress dashboard, you’ll see a number of stars. If you place your cursor over these stars (in most browsers), it will tell you how many people rated it. This is important because if only a few people rated it, it’s not a wide enough sample to get an accurate idea. If it’s five stars and only a couple people rating it, there’s a good chance it’s the developer and their friends doing all the voting. Could a new plugin barely rated or not rated be the one for you? Sure, but the advantage of looking for one rated by many people is tried-ad-true use. Unless you have no deadline and nothing better to do, why be a BETA tester?
So it’s not only about stars. I’d rather take a four-star rated by many people than a 5-star rated by a few. On the other hand, I’ll only try a plugin with a three-star rating (rarely less) if there are few alternatives.
 But what else can we know? If you click “details” in the search results under a particular plugin, it will give you additional information, such as the number of downloads, what minimum WordPress version it requires (or more accurately, what version it was designed for), and up to what version it is compatible.
To find even MORE information, “WordPress.org Plugin Page »” and it will take you to much of the same information, but a lot of extras.
Once you’re there, the rating curve off to the right gives further insight into user experience with the plugin. A few on the bottom end are to be expected — not everyone likes everything, no matter how good it is. Also, a million things can go wrong when it comes to software, and it may have nothing to do with the plugin. Incompatibility with other plugins, the version combination, even the web host’s server environment can cause a plugin to not be able to do its job.
“Last Updated” also gives you a hint if the plugin is actively being improves and bugs being fixed. But the proof in the pudding would be to see how the plugin’s author responds to tech support requests. Oh, wait, there’s a link for that!
Rule #3 – Look at the Support Forum
 Toward the bottom right of the page, under the rating curve and list of the plugin’s developer authors, you’ll find sections titled “Support” and “Compatibility”.
Not all developers use WordPress.Org for their support forums, but the ones that do are visibly more accountable to the user community. Just keep in mind that being free plugins, these developers often cannot keep up on support requests all the time, indefinitely.
But once you click “View support forum”, you will have all he insight you need into the sort of problems other people are encountering. Any particular problem may not apply to you, but if you are looking for a specific feature, for example, and people are talking about wanting it to be added and the developer doesn’t respond or says it will be in the next version, there’s you’re answer. Even a quick glace of thread titles will tell you if some problems are particularly common, in which case you can decide if it’s something that would be a deal-killer or if it’s not important.
Under the compatibility section, you can select different combinations of WordPress and plugin versions. Ordinarily it lists the most recent version of each, which is what you should be using. Like ratings, remember that people reporting it doesn’t work could be their unique problem, but if most people say it doesn’t, it’s a good guess you’re ‘going to have a bad time’.
Conclusion
No quickly discernible factor will predict if a plugin will work for you, or even work at all. But using the above practices, we’ve found plenty of high-quality plugins that serve us and our clients well to provide all sorts of functionality.
Another thing I would add is if the plugin you choose turns into regret, no worries. Unless it’s a complicated plugin that messes with the database, plugins are meant to be installed and uninstalled without consequence, like changing the type of light-bulb you use in a lamp. Just don’t try more than one light-bulb at once for the same purpose — it can cause conflicts and you won’t know which one is or isn’t working.
Lastly, I encourage you to ‘pay it forward’ by creating an account on WordPress.Org (if you haven’t already) and rating plugins and reporting compatibility. Open Source works because of those who came before us and participate now. You can be one of those people, and in the process improve the world, one plugin choice at a time.
Multiple Exclusive Invisible Private WordPress Categories? It Can’t Be Done. Here’s How I Did It.
My father always says “The difficult can be done right away; it’s the impossible that takes a little longer.”
So when I was told it couldn’t be done, I never thought of not trying and instead it became a challenge.
A WordPress client of mine needed to have several groups of pages and posts, each only visible to particular users. And she didn’t want the expense of a multi-site or BuddyPress. To be specific for point of example, it was a teacher’s site to be used by students of various classes she taught, and only students from a specific class would have access to the class content (posts, discussion, uploading of assignments, etc.). Oh, and she didn’t want any of the class pages or posts visible to anyone except a member of a class, and only their class and no one else’s.
There is no plugin that does anything like this and no combination of dashboard settings will even come close. Even geeks du force at the local WordPress user group just scratched their heads and said “it can’t be done”. So I broke down the necessary process into the various conditions necessary to get this done, finding plugins for each, and hoping their combined functionality would fulfill the requirement. And after researching and testing plenty of such plugins, I got it to work. Here’s I how did it:
- I installed the User Role Editor plugin. This enabled me to create a user role that could be assigned a user based on what group (class) they are in. But this requires there to actually be groups, so …
- I installed the User Access Manager plugin. This enabled me to create user groups (one for each class), associate it with a role (with their respective class in step 1), and assign permissions to groups on a page-by-page (or post-by-post) basis.
- I installed the Private Pages plugin. This makes pages invisible to people not logged in, and is based on user role permissions, which is why additional roles had to be created, not merely user groups.
- I installed the Posts for Page plugin. Because we didn’t want the categories visible (not just the posts), we needed to list the posts on a page. This plugin uses a shortcode to do just that. This means I could create a private page for listing the posts of each category (associated with a class’s respective coursework).
Whew! The kicker is that I had no idea for sure it was possible and so did not quote (and therefore did not bill) the client for it. I’m glad I have bragging rights. But the next time someone needs such a complex setup, they’re going to make at least a few mortgage payments for me.
Mind you, if you as a developer need to set this up yourself, you may not need all the plugins. For example, if you don’t care about the visibility of the pages and posts in navigation and only want to content private (with a message saying you don’t have permission), you can skip the last two plugins above.
To recap, here are instructions how to use the system as I set it up above, the plugins having been installed and configured.
To set up a page and/or posts visible only to certain users
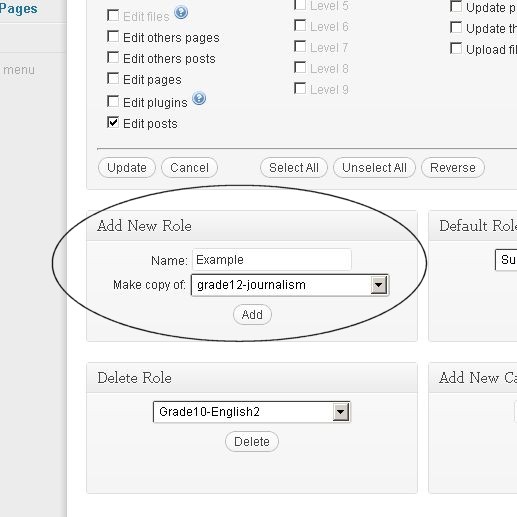
- Go to Users > User Role Editor and scroll down to Add New Role. Set ‘Make copy of’ to whatever permissions you want to give them. Once you Add it, you can tweak the permissions in great detail using the ‘Select Role and change its capabilities list’ on this same page. (In this example, I tweaked the first class role and when I made new ones, I used existing customized class roles to ‘Make copy of’.)
- Go to UAM> Manage user groups and scroll down to Add user group. I recommend naming it the same as the user role you just created, and then select that role under ‘role affiliation’ below. (Don’t worry about the other settings unless you have a good reason to.)
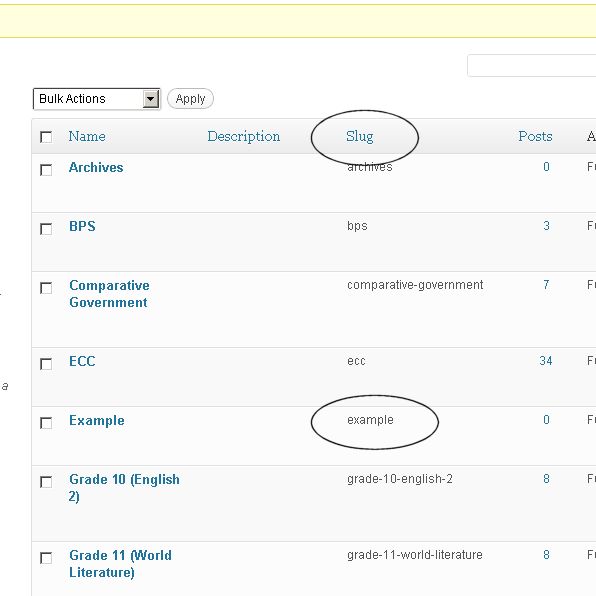
- Go to Posts > Categories and create a category for all the content for a role/group (class in this example). I recommend using the same name as above for consistency. I don’t worry about the group affiliation (‘Set up usergroups’ setting) and it doesn’t seem to matter.
- Once you create the category, it will be listed to thee right, where you can copy the category’s “slug” to paste the next step.
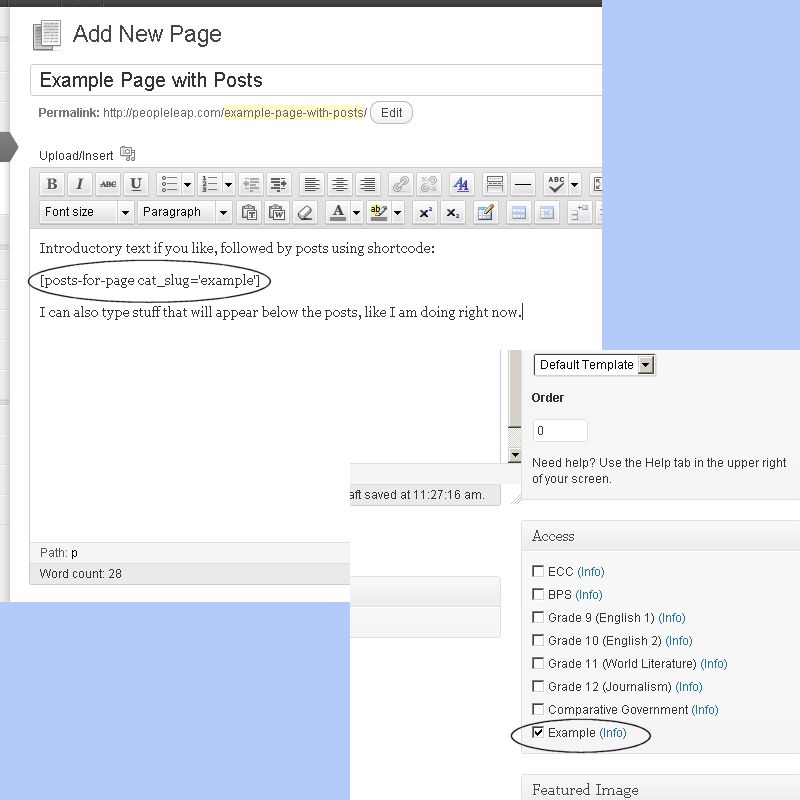
- Go to Pages > Add New and before or after you enter any static content, you can add the shortcode for the posts in the category associated with the role/group (class in this example). The code is [posts-for-page cat_slug=’xxx’] where xxx would be replaced by the category slog from step 4.
- Before publishing (or updating) the page, scroll down to Access and select the role/group associated with the page.

You may not care about visibility in navigation, so some of this is not necessary. However, if you want to shift between visible and invisible with the above setup, here’s how.
Making navigation links of private content visible (and invisible again)
- Go to Pages > All Pages and select to edit the page you need to change visibility. (You can also click ‘Edit Page’ on the front end if logged in.)
- Scroll down to Access and find the role/group associated with the page. If it is checked, it will become invisible except to them. If unchecked, it will be visible in the navigation.
- Click Update and you’re done!
Please note this is being written months after installed and I’ve only worked with it a few times, so I may update this information with further tips or to correct inaccuracies.
WordPress Update Fail
Automatic updating of WordPress has been failing (plugin updating is fine) on blogs installed in sub-directories:
Downloading update from http://wordpress.org/wordpress-3.3.1-partial-0.zip…
Unpacking the update…
Could not copy files.
Installation Failed
Things tried:
- removing the .htaccess file
- deleting the updates area
- repermissioning files
- adding various blocks of code to config and htaccess
- verified our FTP server was the ‘correct’ one.
- tried localhost, direct IP address, host name and a dozen others.
This sort of thing has happened before, and we’re unsure if it’s a server issue or WordPress one. Automatic install of new sites using cPanel works (with current version – 3.3.1).